Time to learn some more!
**Joining a Linky Party
Watch the video below to get the inside scoop on joining linky parties.
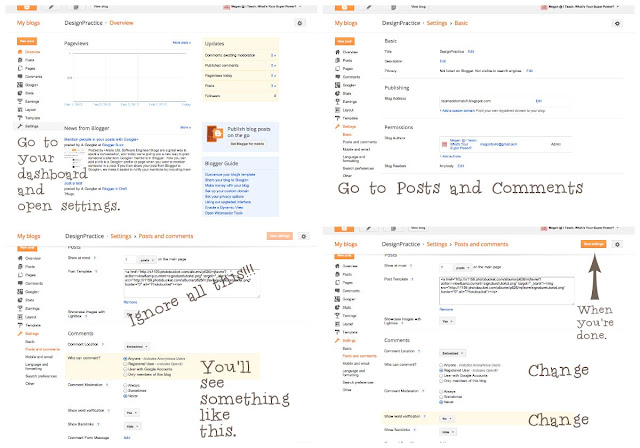
**Raise Your Hand if You Hate Word Verifiers
Reading blogs is fun. Leaving comments is fun. You know what's not fun? Squinting to try and read those stupid word verifier thingies. There are even times I have tried to comment on a blog but couldn't read the verifier and gave up.
Yes, they're trying to help us with spam robots. Spam is out of control. STOP THE SPAM WITHOUT A WORD VERIFIER. Yes, I'm yelling. Here's how:
**Linking a Picture
For no specific reason I can find, Google made this stupid. Why, Google, why? It's totally doable, just requires on extra, totally unnecessary step.
**You won an award! Now what?
Well two things. One-you probably want to put the award on your sidebar. Two-you probably want to put a picture of it in a post where you write about how awesome it was to win that award. Here's how to do that!
To post on your sidebar:
-In the post where you saw the award, right click on the picture of the award.
-Select copy image url
-Go to the Layout section of Blogger
-Select Add a Gadget
-Scroll until you see Picture
-One of the picture options is "From the Web". You can paste that image address in there.
-You might give the gadget a title like "Awards" Creative, right?
-Save
The gadget you just made is on top now. You can drag it down to where you want on your sidebar.
To put a picture of it in when you write about how you won an awesome award:
-In the post where you saw the award, right click on the picture of the award.
-Select copy image url
-Now go to your post
-Click on the icon to add a picture
-Select "From a URL", paste in the address you copied
OR just watch this video.
**Grab My Button
There's no easy way to say this. This is kind of a pain in the butt. It's also really important though.
The first you need is a URL (web address) for the picture of your button.
If you are familiar with Photobucket, upload your button, grab the direct link, and you're good to go.
If you're going, "What's Photobucket?" Here's another option.
-Put the picture of your button in a blog post (you don't have to leave it there). Once you put it in a post, Blogger had to create a URL, even if you delete it.
-Right click on the picture, and select save this link. Now you have your url address! You can delete it out of your post. Or you could be all, look how cute my button is. Whichever works.
Now! You used to have to do a lot of work to get a code. Them some awesome person came up with a website that would do it for you. Awesomeness.
Go here:
Grab My Button Code Generator
Now, once you have your code, go to your layout. Select add a gadget, html, paste in your text, voilá. You're all set.
**Find Your Blog on Pinterest
Want to stalk yourself on Pinterest? It's easy!
Type this in your address bar:
www.pinterest.com/source/teachingsuperpower.blogspot.com
Except you'll put the address of your blog in, not mine.
**Adding Buttons from Other Blogs on Your Sidebar
-Copy and paste their HTML code
-In Blogger, select Layout,
-Add gadget
-Add HTML
-Paste it in that code you copied
-You might give the first one a title like Blogs I Love (whatever works)
-Save
That new gadget will be at the top of your sidebar
-Drag it to where you want
-Keep adding as many as you want! Just drag them down to below your first button with the title
*You have to add a gadget box each time you add a button
Or, just watch this video.
**Adding a Google Doc Link and Preview
-Once you created your document, go to Google docs and upload it.
-Open you document in Google Docs.
-You'll see this:
-Right click on the small "preview" image & select copy image address.
-In your blog post, click the icon to add a picture. Select from URL. Paste in the address you copied.
-There's you picture! Yea.
Now link it up:
-Go pack to your Google Doc.
-Click on the share button at the top.
-Make sure you change "Who Has Access" to "Anyone with the Link"
-Now copy the link that is created for you.
It looks like this:
-Go back to your post
-Click on the preview picture
-Click link at the top (sometimes you have to click on the picture again to get the link button to work, stupid right?
-Paste your link in.
You're done!


